postgres is a root user of postgresql database engine by default. If we want to create another user, first we need to login as postgres root user. The second step is to create any new user we want. In Postgresql each individual database user must has corresponding database that its name must match with the user. Example: if the database username is jack, database named jack must be created and then to be linked to user jack. The last step is to grant several access to that user.
What happens if the postgres root user want to let the other users to access and do CRUD operations on his database and tables ? The following steps below will explain to you the process.
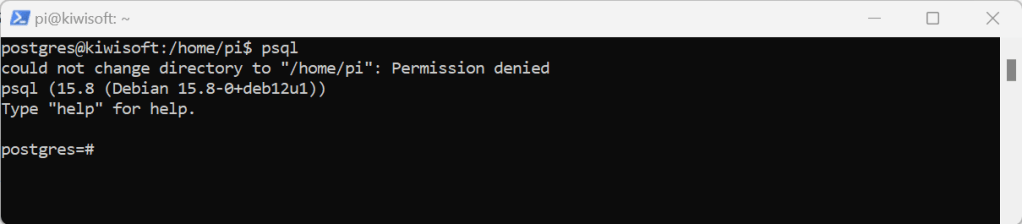
On the pi user prompt, type sudo su postgres followed by ENTER. It means we switch from pi user to postgres database user.
Your prompt changes from pi@kiwisoft to postgres@kiwisoft currently on pi user home folder /home/pi$. To run the postgresql, type psql at the prompt followed by ENTER.
postgres=# user database prompt appears.
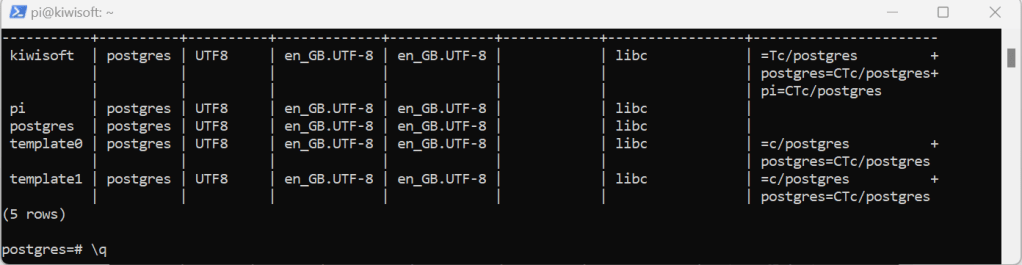
Type \l followed by ENTER, to show the available databases.
MSSQL has built in function to split a string into an array of string. The command is SELECT value FROM STRING_SPLIT(‘your-string’,’separator’).
DECLARE @SENTENCE VARCHAR(MAX) = 'You are my best friend!'
DECLARE @SEPARATOR VARCHAR(1) = ' '
SELECT value FROM STRING_SPLIT(@SENTENCE,@SEPARATOR)
Or we can store the query result into a variable table.
DECLARE @TABLE TABLE(
  WORD VARCHAR(50)
)

DECLARE @SENTENCE VARCHAR(MAX) = 'You are my best friend!'
DECLARE @SEPARATOR VARCHAR(1) = ' '
INSERT INTO @TABLE SELECT value FROM STRING_SPLIT(@SENTENCE,@SEPARATOR)
SELECT * FROM @TABLE
On Raspbian Bookworm OS the pip install commands can not be executed right away from the current user prompt. We need to run virtual environment first (venv) on our raspberry pi os, download the pip package and install it there, login as root user and then install it again globally so pi user also can access it.
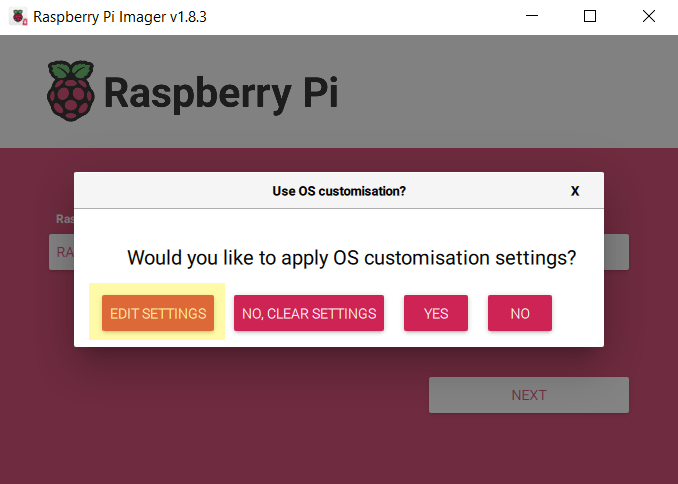
But first we need to prepare the OS. Run Raspbian OS imager, select Raspberry PI OS (64 bit) Debian Bookworm version as seen on picture below.
Because we are going to access our raspbian os via ssh, we need to setup the pi user as well as the WIFI credentials. Click EDIT SETTINGS then YES button.
blah
Just let the default hostname as what ever it is. So with the pi username. You just need to change the password to something easy to be remember like Password123** in my case. You can choose your own. For WIFI credential i am going to let my raspberry pi to connect to my local WIFI hotspot name as WIFI with the same password Password123**. Click Save.
Another dialog window will appear asking for your confirmation. Just click YES button.
It may takes minutes to complete the process depending the speed of your computer.
Once the process is completed another dialog window will appear to advice you to remove the sd card from the reader.
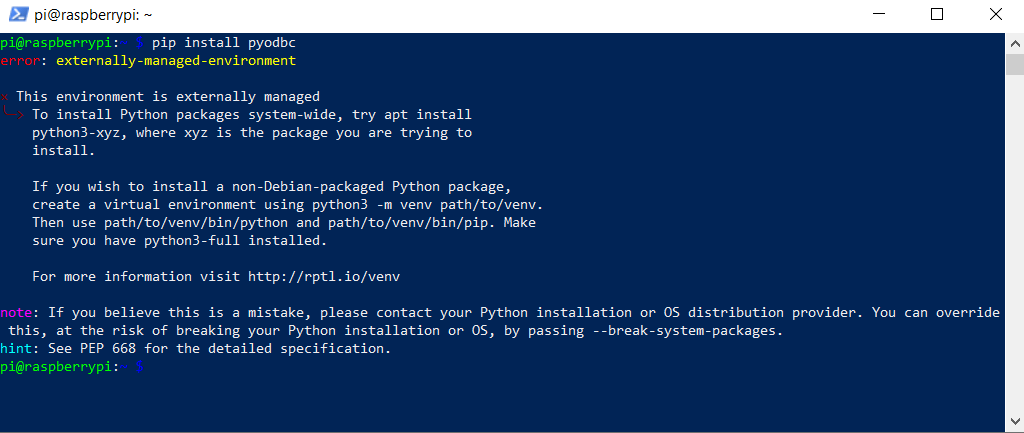
Login to your raspberry pi via ssh. On pi@raspberrrypi prompt, type : pip install pyodbc followed by ENTER. pyodbc is our first library we try to install in this scenario.
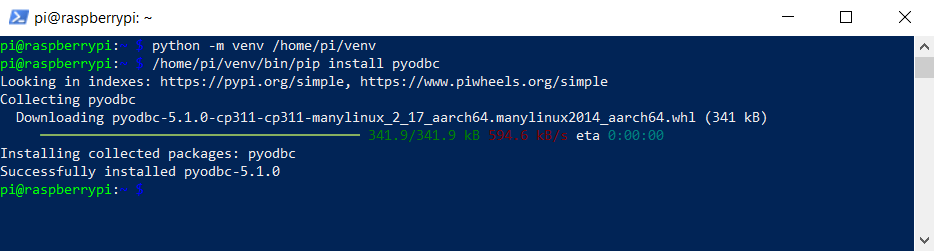
The system returns error message saying error:externally-managed-environment. The rest of the message is description in detail to get the installation right. On raspbian BookWorm version, unlike the apt install command the pipinstall command must be called on virtual environment. To run the virtual environment you need to type python -m venv /home/pi/venv followed by ENTER. After that type /home/pi/venv/bin/pip install pyodbc followed by ENTER.
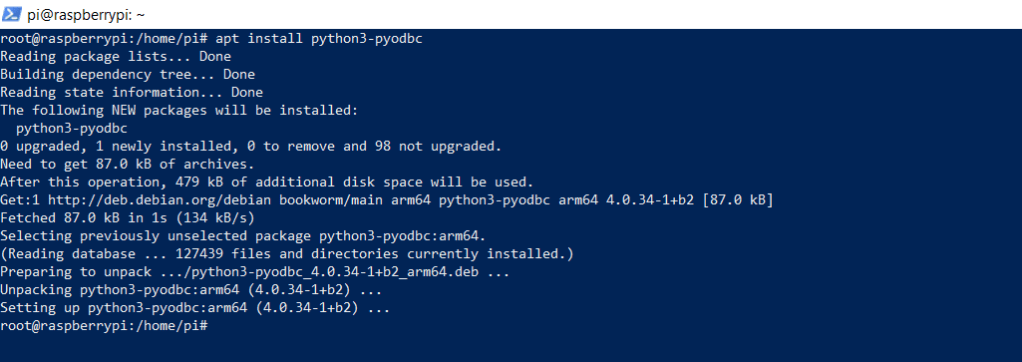
After the pyodbc library is installed on virtual environment, we need to install it to our root as well so our pi user can access it. On pi@raspberrypi prompt type apt search pyodbc followed by ENTER. It finds out the pyodbc package has been saved as python3-pyodbc.
Back on pi@raspberrypi prompt type sudo su to switch to root user. On root@raspberrypi:/home/pi# prompt type apt install python3-pyodbc followed by ENTER.
The prompt may ask your confirmation to continue or not, just type Y followed by ENTER.
Type exit on the prompt to go back to pi@raspberrypi prompt.
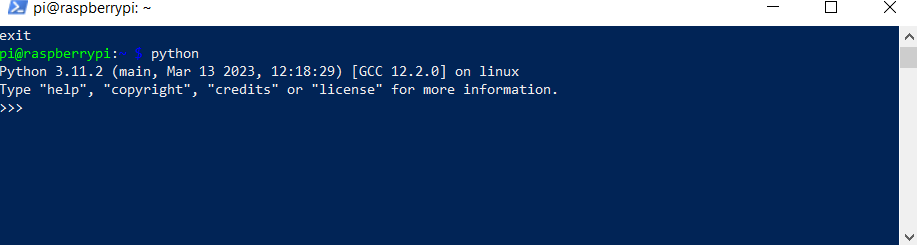
In order to test if our pi user now has access to pyodbc library or not, we need to run the python command to import that library. On pi@raspberrypi prompt type python followed by ENTER.
Once the python >>> prompt appears, type import pyodbc followed by ENTER. If there is no error happens that means our pi user now has access to pyodbc library.
Now you can follow the same steps above to install other pip libraries. To exit python prompt, just type exit() followed by ENTER. You will get back to pi@raspberrypi prompt.
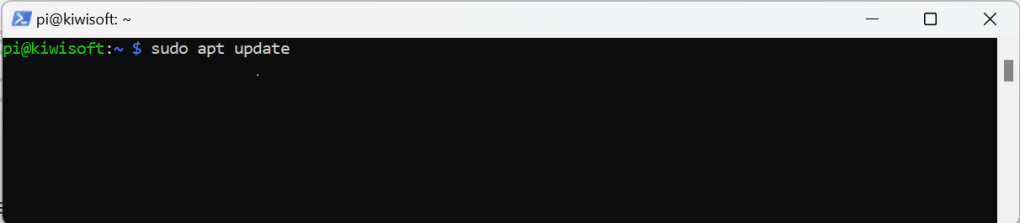
Connect to your raspberry pi via ssh. On the prompt type sudo apt update followed by ENTER.
Then type : sudo apt full-ugrade
After suitability checking process is completed, the prompt would ask you either to continue or not. Type Y followed by ENTER to continue the installation.
It may take couple minutes for installation to be completed. Now we need to remove modules are not needed by typing : sudo apt autoremove on the prompt followed by ENTER.
After finding which modules that are not needed, the prompt will ask a confirmation to continue the process or not. Just type Y followed by ENTER to confirm.
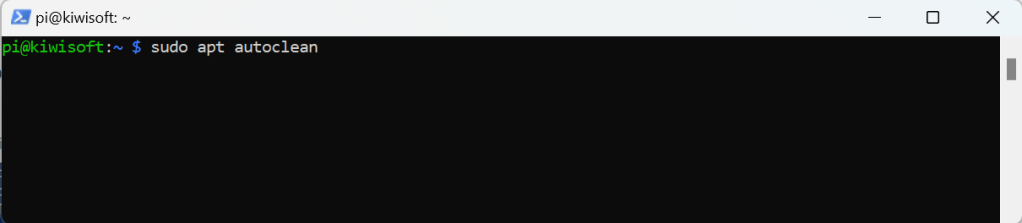
We need to clean the cache. Type sudo apt autoclean followed by ENTER.
Now we are ready to install postgresql database engine. On the prompt type : sudo apt install postgresql followed by ENTER.
After checking the suitability, a confirmation prompt appears to continue the installation process or not. Type Y followed by ENTER.
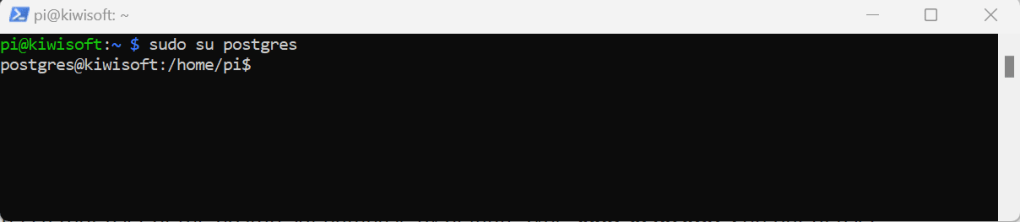
To give our pi user an access inside postgresql , first we need to switch user from pi to postgres user. postgres is a default root user of the postgresql database. Type sudo su postgres on our pi user prompt followed by ENTER at the prompt.
You can see that our prompt appearance has changed to postgres@kiwisoft:/home/pi.
Next step is to get into postgresql database. Type psql on the prompt followed by ENTER. The prompt now changes from postgres@raspberrypi:/home/pi to postgres=# which is a database prompt.
To clean the screen, type \! clear followed by ENTER on the postres=# prompt.
To enable our raspberry pi user to access our postgresql database we have to create the same pi user and pi password on our postgresql database. On database prompt type CREATE USER pi WITH ENCRYPTED PASSWORD ‘your-raspberrypi-pi-user-password’; followed by ENTER.
Next is to create a new database and name it as pi for our pi user. It is necessary to be done otherwise the pi user won’t be able to access the database engine. On database prompt type : CREATE DATABASE pi; followed by ENTER.
Now we create another database, in my case i choose kiwisoft for my database. On the postgres-# prompt type CREATE DATABASE kiwisoft; followed by ENTER.
To make sure that kiwisoft database has been succesfully created, type \l on the database prompt. This postgresql database will then show the list of existing database including the kiwisoft database. You also see pi database there.
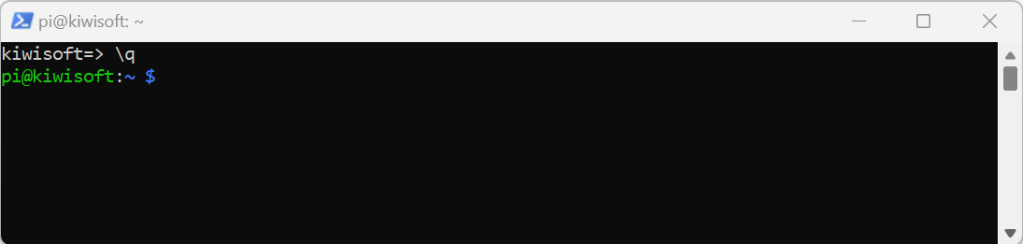
Type \q to go back to the previous prompt.
After we convince kiwisoft database is created, we must give all permission to our pi user on that newly created database. Type Type q to go back to postgres-# prompt. Then on postgres-# prompt GRANT ALL PRIVILEGES ON DATABASE kiwisoft TO pi; followed by ENTER. Then type GRANT ALL ON SCHEMA public TO pi; followed by ENTER.
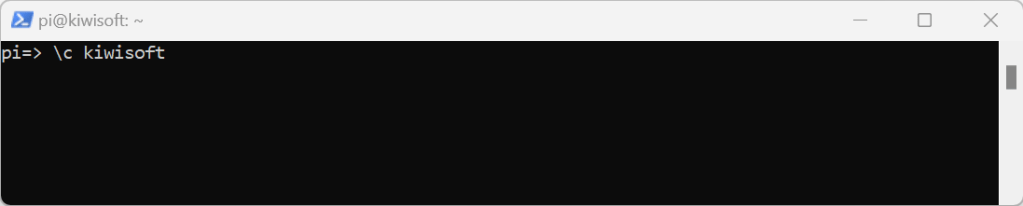
Now, it is time to test if the pi user has permission to access postgres database engine as well as kiwisoft database. On postgres-# prompt type exit followed by ENTER. Type exit again followed by ENTER to go back to pi@kiwisoft prompt.
On the pi@kiwisoft prompt type psql followed by ENTER.
The p=> is your postgresql prompt. On that prompt type \c kiwisoft because we are going to connect pi user to kiwisoft database.
You will get prompt message once your pi user is connected to the database.
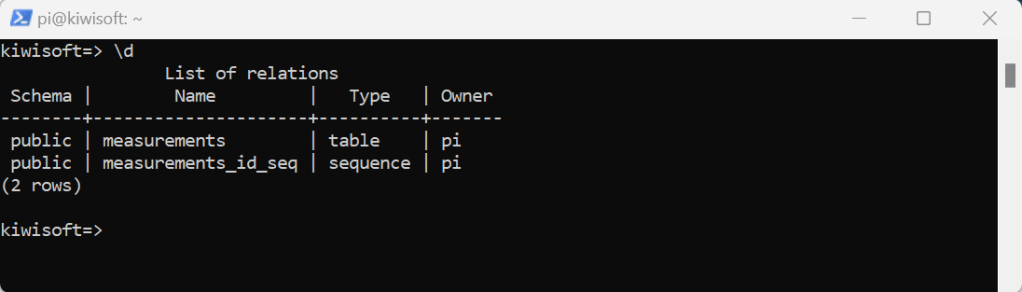
The kiwisoft=> prompt means you are currently connected to kiwisoft database. Let create our first table. We name it measurements.
CREATE TABLE measurements (
  id BIGSERIAL PRIMARY KEY,
  serialnumber VARCHAR(25),
  temperature FLOAT,
  humidity FLOAT,
  status BOOL DEFAULT false,
  created TIMESTAMP,
  updated TIMESTAMP
);
Copy above sql script and paste it on the kiwisoft=> prompt.
To view all the table from the current database, just type \d on the prompt followed ENTER.
On the same database prompt, copy and paste the following sql query. We are going to test the insert operation.
insert into measurements(serialnumber,temperature,humidity)values('a3bc2ff601',14.5,35.7);
Let see if your insert operation was truly succesful. Copy the following sql query below then paste it on the prompt followed by ENTER.
select * from measurements
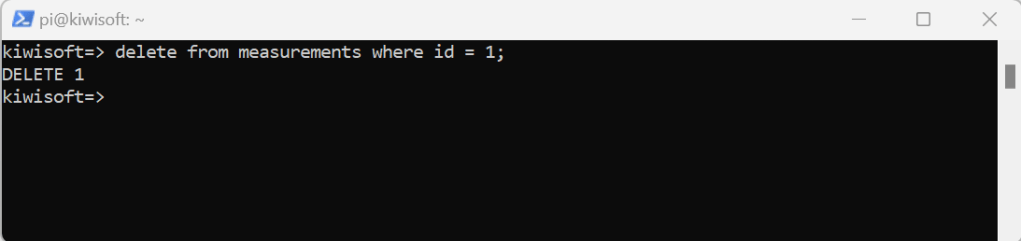
Copy and paste the following sql query to run update operation.
update measurements set temperature = 17.33, humidity = 20.3 where id = 1;
Type \! clear to clear the screen. After that try the following query to delete
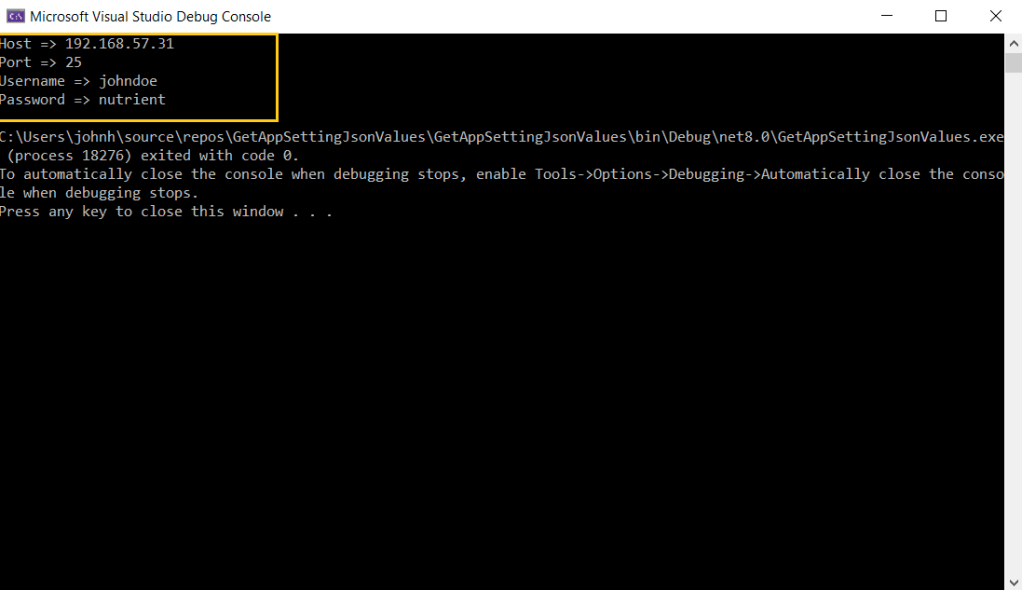
Open your Visual Studio then select Create a new project.
Select Console App.
Name our new project GetAppSettingJsonValues.
For the Framework, i choose .NET 8, because that is the only .NET version i do have on my computer. You might want to choose other version.
Click Create button. A window with two panels will be opened side by side. The right panel is Solution Explorer as you can see below. By default the .NET CORE console app will generate Program.cs file for you.
The left panel of the window is for editing Program.cs. If you are on lower version of .NET CORE, you may still get the Main() static method as a pregenerated code. Because i am on .NET CORE 8, the format has changed or simplified like seen below.
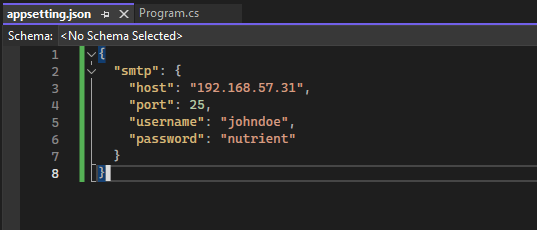
Go back to Solution Explorer panel again, right click your mouse on the project name and select Add, New Item, Text File, change the name of the file to appsetting.json followed by clicking Add button.
On the left panel of your window, your new appsetting.json is opened and copy the following json data into that file.
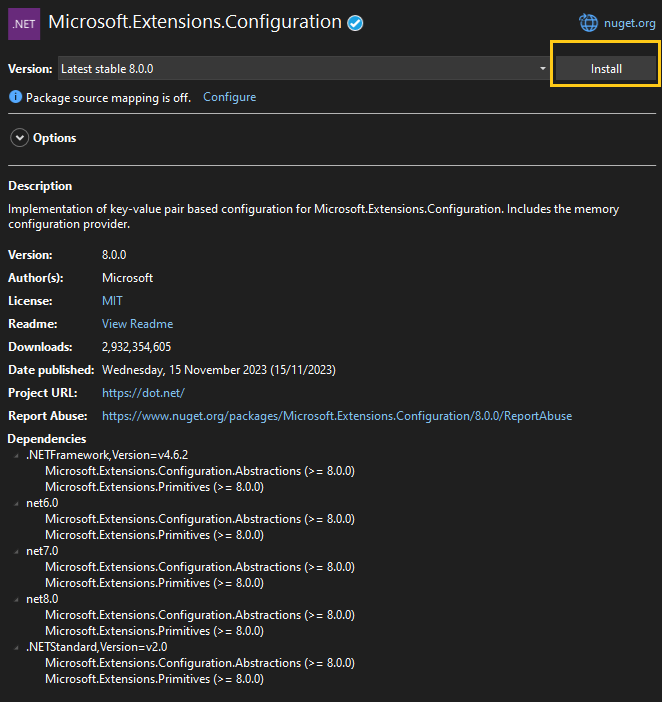
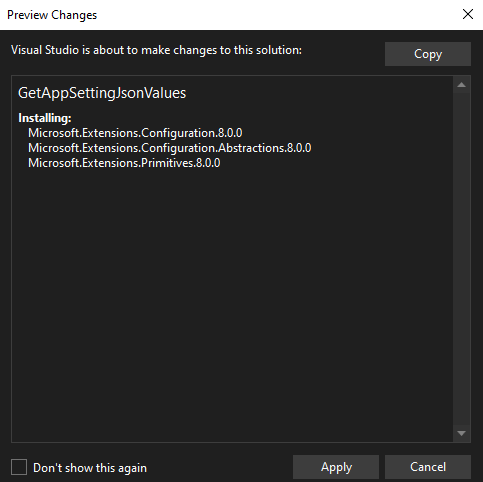
Select your project name on Solution Explorer panel. Right click, select Manage Nuget Package. A nuget package manager window will appear on your left panel. Click the Browse tab. and type Microsoft.Extensions.Configuration on the search text box. You would see Microsoft.Extension.Configuration package on the search result. Select that package and install it to your project.
You need to click Apply button to confirm your package installation.
The next package you need is Microsoft.Extensions.Configuration.Binder. You need to repeat the process. Type that package name on search text box, select it from the search result list and then install it.
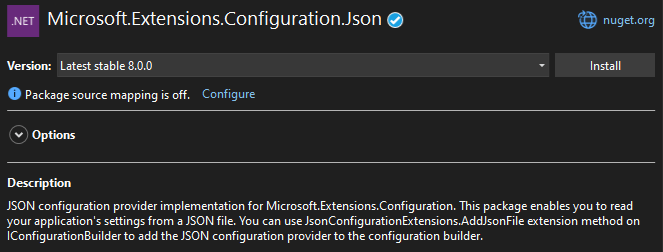
The third package you need is Microsoft.Extensions.Configuration.Json.
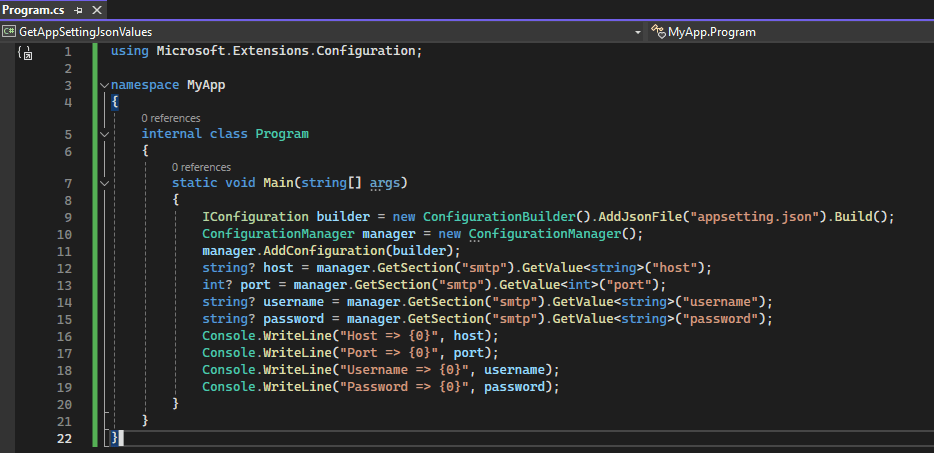
Copy the following C# code below to Program.cs file on the left panel of the window.
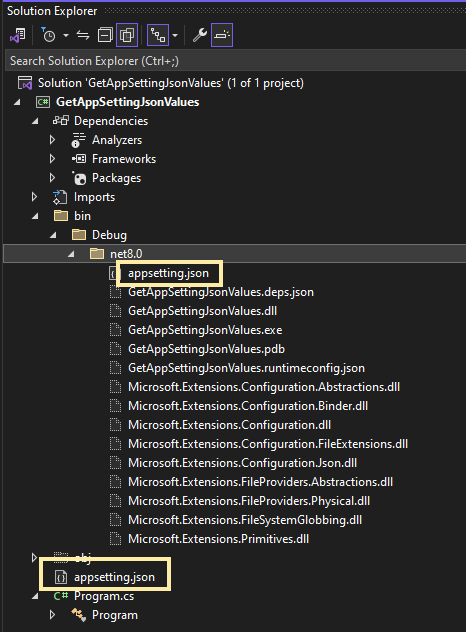
On the Solution Explorer, select the project name, right click and select Build. You will see a bin folder being built. This folder has sub folder which named by default based on your .NET CORE version. Because i am on version 8, the sub folder i am getting net8.0.
Before we can run our console application, we need to copy our appsetting.json from project root folder to that sub folder. Once you have done it, press F5 to run the application.
This article is a continuation from my previous article on SETTING UP REYAX RYRL998 WITH FTDI232 . We are going to use the second Reyax module we had setup on previous article to be connected to our Raspberry Pi 4 B.
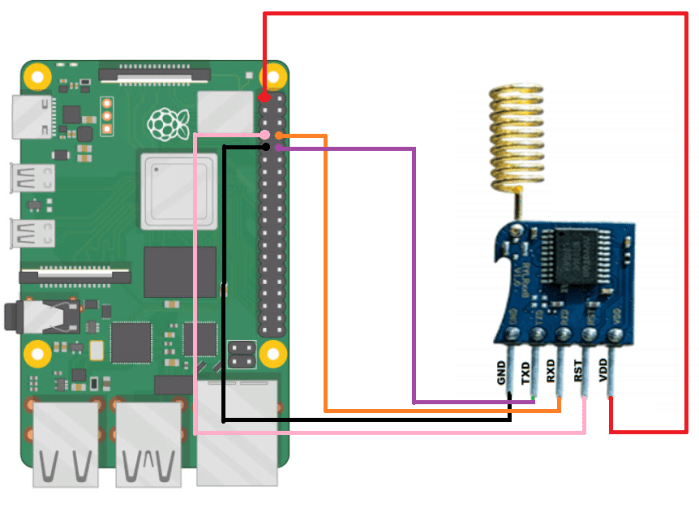
Please the following information for the wiring between Reyax RYRL998 module to Raspberry Pi 4 B:
REYAX RYRL998
RASPBERRY PI 4 B
RX
TX – GPIO 14 (PIN 8)
TX
RX – GPIO 15 (PIN 10)
RST
GPCLKO – GPIO 4 (PIN 7)
VCC
PIN 1
GND
PIN 9
Below is the Raspberry Pi 4 B GPIOs and PINs schematics.
This is how the wiring supposes to look like.
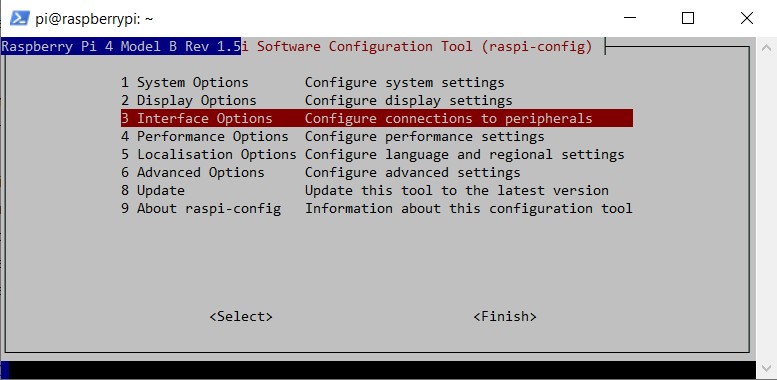
After the wiring is completed, we need to enable the serial port on Raspberry Pi 4 B. After connecting to your Raspberry Pi 4 B , on the prompt type : sudo raspi-config.
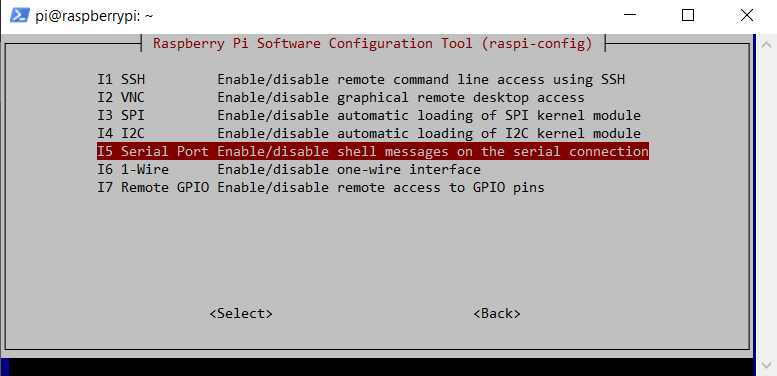
On the Software Configuration Tool, select Interface Options or number 3, click ENTER.
On the next menu, select Serial Port, click ENTER.
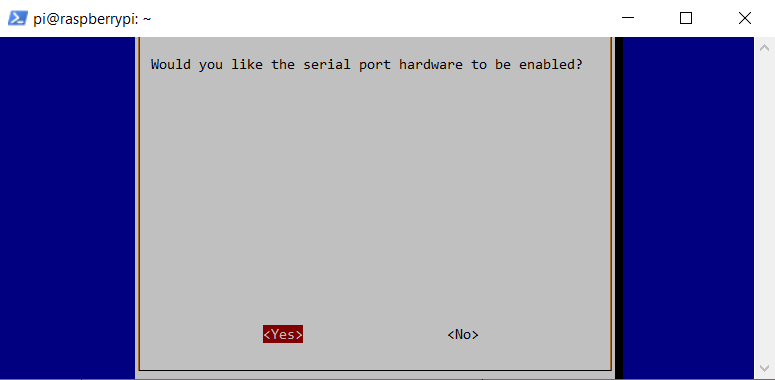
Select NO, click ENTER.
Select YES, then click ENTER.
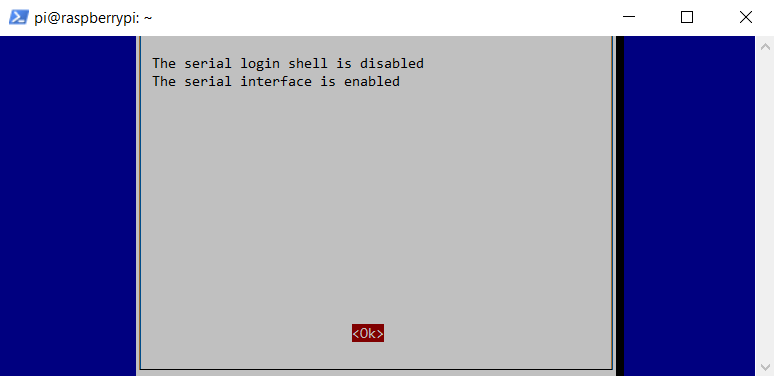
Click OK, followed by ENTER.
Select FINISH to go back to the prompt.
On the prompt, type sudo nano /boot/config.txt
At the end of the page, add the following statements :
disable-bt=1 enable-uart=1
Click CTRL+O to overwrite, then CTRL+X to go back to the prompt.
Time to disable bluetooth service. On the prompt type : sudo systemctl disable hciuart.service
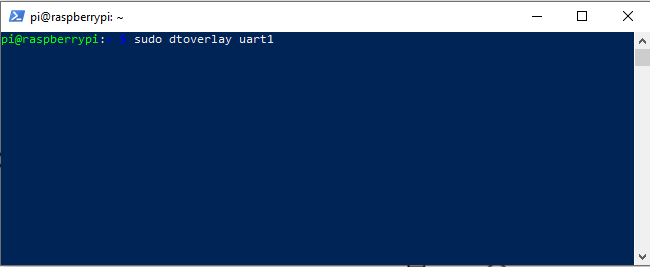
To make sure the uart1 is enabled with the device tree facility before the code is running, type sudo dtoverlay uart1.
To test our raspberry pi 4 B able to receive the message from REYAX, we must create a python script. We are going to use python build in serial library. On the prompt type sudo nano test.py. Copy the following code below and click CTRL+O to save, then CTRL+X to exit. Note: the baud rate may vary and you match against the baud rate of the sender. In this scenario i am using 9600 for the baud rate because my data sender use the same number.
import serial

try:
     fabkit = serial.Serial('/dev/ttyS0',9600)
except:
  print("Failed to connect")
  exit()

while 1:
  line = fabkit.readline()
  print(line)

fabkit.close()
CTRL+O to overwrite, then CTRL+ X to go back to the prompt.
Before we can use RYLR998 lora module, we need to setup some settings to make it works. In order to do so we need to connect our RYLR998 module to our computer via serial translator FTDI232. As a reminder, RYLR998 lora module run on 3 volt. So make sure you set your FTDI232 to 3 volt instead of 5 volt (default), otherwise you would damage the lora module.
As you can see on above picture, make sure you connect RYLR998TXD pin to FTDI232 RX pin. Then connect RYLR998RX pin to FTDI232TXD pin. Don’t forget to connect RYLR998 GND to GND on FTDI232 and RYLR998 VDD pin to FTDI232 VCC. Plug in your FTDI232 into your computer.
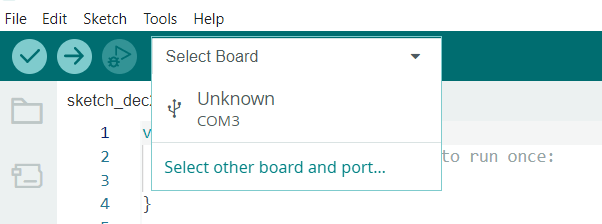
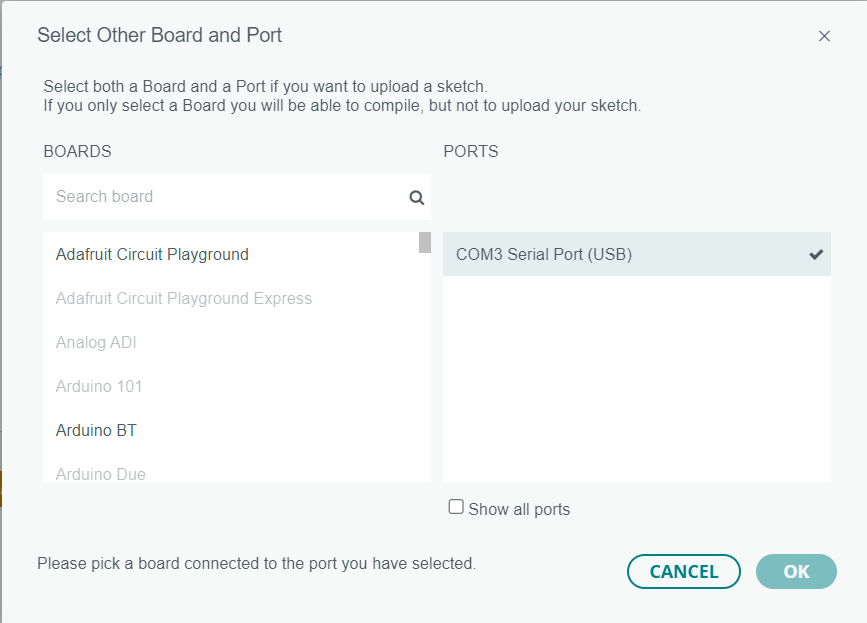
Now open your arduino IDE. Click Tools, Port then select the COM port available. There is a Select Board drop down menu, select the COM port.
Select any board example Adafruit Circuit Playground. Then Click OK.
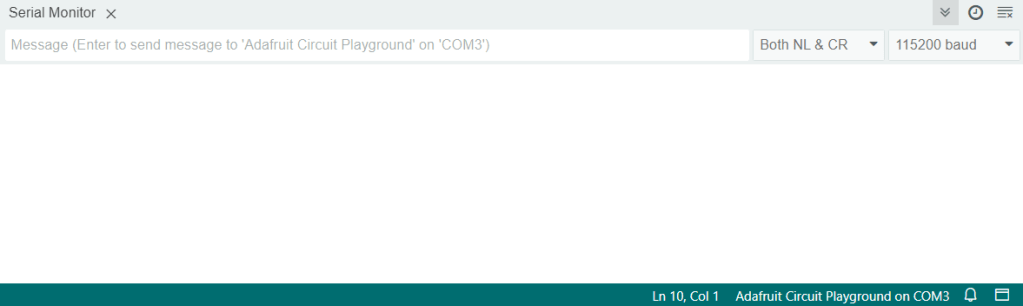
Next is to click Tool then Serial Monitor. You will get another sub window with input text box parameters. Inside this text box parameters we can run the AT COMMANDs. If you look on the top right Serial Monitor, you can see 2 drop down list. By default the RYLR998 module is on 115200 baud rate. The second drop down list from the right is a setup on how the serial message is about to be parsed. By default every message is ended with New Line and Carriage Return.
To check if the lora module is working, on the textbox parameters type AT followed by ENTER. The proper response supposes to be +OK.
Now to check the current firmware on our reyax is by typing : AT+VER?
To make sure each RYLR998 modules are able to communicate each other, they must be on the same network id and having unique address.
To setup a new NETWORKID, type AT+NETWORKID=12, followed by ENTER.
To check if the newly setup is saved, type AT+NETWORKID? followed by ENTER.
To setup a new ADDRESS, type AT+ADDRESS=16, followed by ENTER. In order two lora modules able to interact, both module must be on the same NETWORKID and having different ADDRESS.
To check if the new ADDRESS has been saved, type AT+ADDRESS? followed by ENTER.
For security reason we must make sure both ends are secured. So both must have same password in order to understand each other. On Serial Monitor text box parameter type AT+CPIN=AC14497F (replace with your own 8 hex numbers).
To check if the new PASSWORD has been saved, type AT+CPIN?
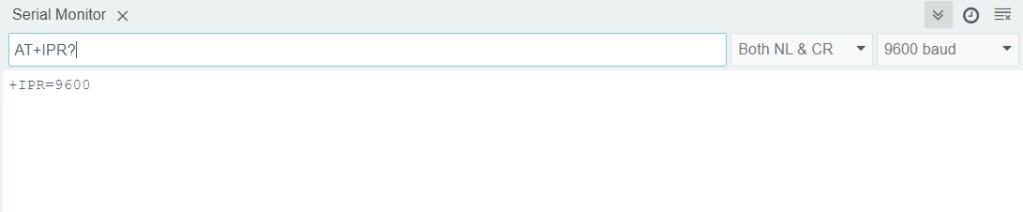
If you want to change baud rate, type AT+IPR=baud rate.
To see if the change has taken place then type : AT+IPR=?
We setup another Reyax with the same parameters except the address is 17. This Reyax will be used on Raspberry Pi 4 which is be used as a gateway. Now it is time to setup this Reyax on our Raspberry Pi 4 next article.